We jumped back in where we left off yesterday with students investigating the relationship between perimeter of a triangle and scale factor and then area and scale factor. Here are our conclusions:
And our "official" consolidation:
Next, we moved on to trig starting with a warm-up to get them thinking of sine, cosine and tangent again. When they completed that, they started on this matching activity (the warm-up is included in this file). They will keep working on it tomorrow.
Here is today's homework set.
We changed tacks today and returned to similar triangles. We had not proven that triangles were similar before solving for missing sides in cycle 1, so that was the focus today. We began with this handout. We looked at the first case (SSS~) in detail together and then discussed AA~ and SAS~. The highlighters came out again to help them identify corresponding sides.
Next, we put this into practice with a couple of examples which allowed students to get a refresher on how to solve for a missing side length.
Part way through those examples I lost half of my class to Inside Ride. The timing wasn't too bad as there an investigation up next. I "stole" this from myself - I made it for my grade 10 applied class. I think it is a nice combination of looking at relationships (linear & quadratic) and similar triangles. They got a lot of the first page done (perimeter) so will continue with area tomorrow.
Here is today's homework.
Looking over homework set 16 last night only confirmed that my students generally had no idea what I was asking them to do. I started today with a triangle in GeoGebra and asked what kind of triangle it was.
They said they couldn't tell - that we needed to know the side lengths. I showed them the side lengths and moved the vertices around to create different types of triangles. I then asked how they could tell if they only had the coordinates of the vertices. A little brainstorming in their groups led them to say that they could find the distance between points. Bingo! There were still some confused looks so I picked some random points and they told me how to find the length of that segment (see shot of whiteboard, below).
Then I asked how we could tell it was a right triangle. Measure the angles, of course! When I asked if they could really tell the difference between an 89°
angle and a 90°
angle when measuring with a protractor, all but one student said no. More brainstorming followed and they came up with the strategy of finding the lengths of the three sides and seeing if the Pythagorean theorem holds true. I made my triangle in GeoGebra have a right angle and asked if that strategy worked. It looked something like this:
It was very close to working, but not exact because the side lengths had been rounded. If students had used the distance formula to find the side lengths and kept the lengths in exact form, then they could definitely show whether there was a right angle. But what if they didn't want to calculate all the side lengths? How could they show that two lines crossed at a right angle? I added lines in GeoGebra to help clarify what I was asking but that didn't seem to help. So I opened Desmos and entered two equations in standard form (which I then hid) and asked them to talk in their groups again.

As I circulated and asked what they had figured out, groups slowly began saying words like "perpendicular" and "slope" and "negative reciprocal". I showed them my equations which I rearranged into slope-intercept form and they could see that one had a slope of 2/3 while the other had a slope of -3/2. Okay - back to our triangles... we can find the slope of each line segment and compare them to see if there are any negative reciprocals to determine if it is a right triangle. This was the work on the whiteboard along the way:
We also talked about whether you could use more than one descriptor for a triangle. Can you have an equilateral right triangle? An isosceles right triangle? How many are possible? They seemed to indicate that they now understood what to do for homework set 16 so I told them that they would get a second try at it tonight (no new homework).
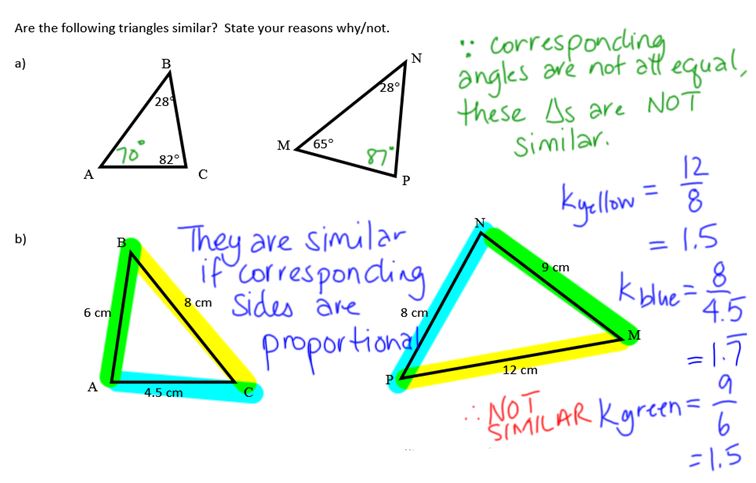
Our little (ha!) aside taken care of, we turned our attention back to similar triangles. I had students do a little recap of yesterday's work to help those who had missed yesterday's class. Then they worked through two questions that asked whether the triangles were similar:
And then two questions where they had to find missing information:
They had a little time to start working on this similar triangle handout, which we will continue tomorrow before jumping into trig.
While my students started on this investigation about similar figures, I took a look through the homework they had handed in (homework set 16). Yikes! Clearly, the vast majority of my class did not make the link between finding the distance between two points and the lengths of the sides of triangles. I will go through their homework more carefully later, but I definitely need to make some time in class to have them find the connections.
I have to say that my preparation for today turned out to be less than stellar. I chose to use the investigation I have used with my MPM2D class before and a handout that I use with my grade 10 applied class. I should have thought through this a little more and consolidated the two into one as there was considerable overlap. So noted for next time. Meanwhile, my students were measuring angles and side lengths, and trying to draw some conclusions about what makes shapes similar.
It didn't take long for there to be consensus that all the corresponding angles were equal. However, I have these set up so that it could look like there is some additive property between the sides if you don't check all the lengths. It took a bit more work to sort out that each side of the smaller shape is in fact multiplied by a constant to get the length of the corresponding side in the similar shape. I stopped there with this investigation (some had already been working on the flip side). Before switching over to this handout, we went over how sides and angles are names in triangles, along with a few pertinent facts.
Then they once again measured side lengths and angles - I suggested they split up the work within their groups and this is what we found:
They seemed to understand that the 1.7 means that the larger triangle is 1.7 time larger than the smaller one. We gave the number a name and talked about how you can tell if triangles are similar. I am not emphasizing proving similarity during this cycle - I will do that in cycle 2 or 3.
Next I got out the highlighters so that we could work through an example together. I encourage my students to highlight corresponding sides when they start working with similar triangles. It then becomes obvious which sides are corresponding as they work through the question. I heard things like "We know both blue sides so we can use those to find the scale factor".
I loved it when a student suggested multiplying 12 by 1.5 to get the length of x. We tried and decided that 18 didn't make sense for the small triangle and therefore needed a different strategy.
We will continue with more similar triangle work tomorrow. Here is today's homework set.
We did today's warm-up quickly as we had a lot I wanted to get done. Here it is:
I was surprised at how poorly some students understood what the numbers meant. A number of them divided the diameter by the number of slices and compared the results. I actually had to draw a circle, then the diameter and divide it up to help them make sense of what they had just calculated. Eventually they understood that we needed to compare areas. Here is one student's solution (he figured it all out on his own):
And my consolidation:
After the warm-up we talked about similar triangles. I asked what they knew about similar triangles. They said that they were the same only different sizes. Someone mentioned scale factor. I asked what the scale factor told you about the triangles. They replied that it was how much bigger the larger one was (I know it could go the other way). We moved on to doing a couple of practice questions (links to handouts are below). Here is the first one:
We went back to colour-coding corresponding sides which really does help some students. We found the scale factor, made sure everyone understood what that number meant then used it to find the missing side. The second example involved angle of incidence and angle of reflection, which they have learned about in science class.
They worked out the height of the statue after I demonstrated the process using a mirror. I then put them into random groups and set them on their way to collect data for two objects with inaccessible heights within the school. Some groups needed more guidance to correctly collect their data. They worked out the missing heights when they came back to class, although for many, their work ethic did not seem to make it back to class (the perils of letting them "loose"). Once done, they started to work on a trig practice sheet involving finding angles. I was pleased that they remembered to start by labeling the sides with "opposite", "adjacent" and "hypotenuse".
Here is the mirror activity handout and here is the practice worksheet for solving for an angle using trig. More trig on deck for tomorrow.
We did our first non-height Estimation 180 today:
The too-low guess was 1 and the too-high ended at 56 (not 1 million, as was suggested). Their guesses were all in the 15-25 range. Someone even suggested that the measuring cup is a cylinder and we could estimate its volume. Estimating the volume of one almond made the rest of this process difficult, however the idea of figuring out approximately how many almonds would fit in the bottom of the cup, then how many "rows" there would be is a good strategy for estimating.
I decided to also do the follow up one:
There were interesting strategies here that led to very specific estimates - clearly from actual calculations. One student saw the large container as holding 3 of the 1/4 cups along the length and 3 along the width, then estimated the height and used the number of almonds in the 1/4 cup measure to come up with an estimate.
I am still happy with how the warm ups are going and really like the routine they provide at the start of each class.
I intended to jump into trigonometry, but realized that my students had not done any similar triangle work in their exercise books because I was away last Thursday and Friday. I gave them the copies of this handout I made oh-so-long ago. It was especially good to go over this as I had two new students added to my class in the past few days (another benefit of spiralling is that these students will see all the concepts they missed in the 1st cycle during the 2nd, 3rd and 4th cycles). This is what it looked like:

Again, I focused on having them make obvious which angles and which sides matched up and on making sense of our answers. The student I asked to explain how to find y said that the y side matched up with 14 side so we needed to multiply 14 by the scale factor of 1.75. We did and decided that the answer should, in fact, not be bigger than 14 so we should have divided by the scale factor instead. I want my students to reflect on their answers and adjust their strategy if their answer is not reasonable.
On to trig. I started by showing them this video called Boat on the River which I found on Andrew Stadel's 3-act catalog:
There were some silly questions that arose, but I jumped on this one: "What's the angle of the boat?" I explained that sailboats are expensive and taking the mast down is an expensive process that usually requires a crane, as does putting the mast back up. So as the captain of this boat, if they could make it under the bridge without taking the mast down, that would be a very good thing.
I talked a little about the fact that we are still working with triangles, only they have the be right triangles now (unlike some of our similar triangles). We started by going over how we name the sides of a right triangle, based on a marked angle:
I got them to practice identifying the sides of triangles with the first page of this handout that I found on-line here. Once they seemed to have a good handle on correctly naming the sides we moved on the activity part of this handout. In groups, they had to create right triangles with an angle of 10, 20, 30, ... , 80 degrees, measure the sides and come up with ratios of the sides equivalent to sine, cosine and tangent. (I should note that I do not mention the words sine, cosine or tangent until cycle 3.) They did this on chart paper so that all the members of each group could be contributing. They started creating their own trig tables... and will finish tomorrow.
It's Monday and that means counting circle. Today I thought we would work with some negative numbers so we started at -173 and went up by 4. Many were using their fingers or counting up by 1 four times aloud so I opted to stick to a simple counting circle today.
We did discuss the pattern in the one's digits after we finished, which some had not noticed. Hopefully that will give them another strategy for next time.
While I was away, my class took two days to work on similar triangles. I love that spiralling gives me the freedom to spend the time needed to properly work through each concept. As a result, what I wrote about here didn't happen on Friday so we did that today (handout). But first, we did a quick recap of solving for a missing side with similar triangles:
We colour-coded the corresponding sides, calculated the scale factor then solved for the missing sides.
Today's work was my attempt to tie together similar triangles with linear and quadratic relations. I was happy with the questions that came out of filling in this table:
They had to really understand what the scale factor represents to be able to use it appropriately in this table. They also had to understand that the pattern didn't help them for the last two entries as the scale factor is no longer going up by 1. There were a lot more issues that came up out of this work than I expected, but it is great that they were able to put it all together with a little guidance. I don't know how many times I asked "How much bigger is a 6-8-10 triangle than a 3-4-5 triangle?" and "If the scale factor is 17, what does that mean?". They were making connections and I made them keep trying even when they wanted to quit. We will consolidate tomorrow then move on to trig.
Today's warm up is a Daily Desmos-like challenge:
The great part about this is that, if all goes according to plan*, this is the perfect segue to what is coming next today. (*I am out of town and don't know how far the class got yesterday.) I want students to come up with the equation of the line shown (likely by finding the slope and noticing the y-intercept) and then check their equation using Desmos.
On to the main event. I wanted to tie triangles back to the linear and quadratic work we did earlier this semester so I made this handout. Students will begin by calculating the perimeter for all the triangles from family 1 (from our similar triangles work) and add a few more triangles to the list. They will look at the pattern of the results and hopefully notice that is is constant when the scale factor increases by 1 and a multiple of the previous pattern when the scale factor increases by more than one.
Next they will graph the results and determine a model which will allow them to answer some questions about larger triangles. You may notice that I am giving them a graph with the scale set up for them and the axes labeled. As we progress through the course, I will give them less and expect more.
On to area:
I predict a lot more issues coming up here. They have a column with the length of the hypotenuse, but don't use it to calculate area. All the triangles used here are right triangles which they have drawn, so they can refer back to them for help with finding the area, but will they think to do that? The pattern and pattern in the pattern (1st and 2nd differences) should work nicely if they calculate the area correctly. It will be interesting to see what their graphs look like and how many come up with an equation to represent the relationship.
On Monday I will see how it all went. I do love how this connects linear, quadratic and similar triangles - like a spiral within the first spiral : )
I am currently in Toronto about to spend 2 days working with Apple. So this post and the next one are "what should happen", not what happened in class.
Today's warm up is this Would You Rather:
I did this one with my 2P class last semester. This may seem like a simple calculation exercise, but it was challenging for some. Many calculated how much they would make in a day, then in a week, then in a month, then in a year and they did not get the same answer as someone who went from one week to one year. There was some interesting debate about how many hours per day is "normal" - is it 8 hours or 7.5 hours? If you work on a per hour basis, does that include vacation time or sick leave? (Some of these questions are addressed on the WYR site, but I wanted my students to think about them.)
The plan for today is to learn how to find missing side lengths in similar triangles and practice that skill. I am trying to encourage them to highlight corresponding sides in matching colours and label corresponding angles with the same symbols. I find that they understand how to find the length of a missing side best by first calculating the scale factor. I suggest doing large triangle over small triangle so that the scale factor represents how many times bigger the large triangle is compared to the small triangle. (They are always welcome to use other mathematically correct methods.)
Here are a couple more examples to work through with them:
They will practice a little more (page 3 of this handout) and then they will work on this handout which includes a few shadow and mirror questions.
We did two warms up today, as I did not think I should leave a warm up for the English teacher covering for me yesterday. This Estimation 180 was first, where they had to estimate the height of the lamppost:
They did a good job of saying that a "too low" guess was at least 6'4" as that is Mr. Stadel's height. Their reasoning for their actual estimates was solid - they said the lamppost seemed like it was 2.5 to 3 times his height so their estimates were in the 15' to 19' range. One student had said 15 m so we talked about the units they choose to use and that 15 m would be about 7 Mr. Stadel's stacked one on top of the other!
On to today's visual pattern:
I think the colours are very leading in how students saw the pattern. I would prefer to have all the blocks the same colour so that different students might see the pattern in different ways. It was great that one student thought the pattern was 3n + 2 and we talked about what that meant and why it was different from 3 + 2n.
I did show them a different way of seeing the pattern and how it was the same as what they had found.
I would like to say we took up the triangle families handout from yesterday, but they hadn't actually done it yet. So they drew triangles and measured the angles with protractors. They noticed that triangles in the same family have the same angles and there was a pattern in the sides. For the first family:
they saw this pattern as "add 3 (to the first number), add 4 (to the second number), add 5 (to the third number)". This was good, but I wanted to move toward finding the scale factor. I asked how they could get from 3-4-5 to 15-20-25. They had to think about it for a bit and came up with "multiply each number by 5". Yes! We looked at the next family and they all told me that they had to multiply by 2 this time.
We moved on to this handout which we went through a little faster than I would have liked because I will be out of town tomorrow and Friday. I had them use different colours/symbols for the corresponding angles, then I pulled out the highlighters and had them highlight corresponding sides. We measured angles and sides lengths and calculated the ratio of corresponding sides.
And that is where we had to stop.