I thought I would write up a quick post to share the Desmos activities that I made over the past couple of days. I will be using them in my grade 10 academic class in a few weeks, when we get to quadratic transformations.
Creating an activity using Desmos Activity Builder is pretty straightforward and produces good results. I love that students can work through an activity at their own pace and that both students and teachers can get feedback throughout the activity. If you are interested in making your own, go to teacher.desmos.com, scroll to the bottom of the page and look for "Create with Activity Builder". There are great instructions once you have entered the title of your activity.
So - here are links to my quadratic transformation activities. Part I deals with horizontal and vertical translations and Part II works through reflections about the x-axis and vertical scaling before putting all the transformations together.
As always, I welcome feedback! If you are looking for more Desmos activities, check out the searchable Desmos Activity Bank. And if you create your own activities, be sure to submit them to the bank.
Monday, 12 October 2015
Thursday, 8 October 2015
MPM2D - Day 22: Trig
We started today's class by looking at the trig tables they had created along with my version of it.
I asked if we had similar numbers for the ratios and, for the most part, they said we did. I looked at them with a furrowed brow and said "But my triangles were not the same as yours. Why would we have the same ratios?" I was surprised (in a really awesome way) at how quickly someone said that all of our triangles for a particular angle were similar (reflecting on this, I should have given more wait time and had them talk about this in their groups). We explored that a little further to emphasize that each side length is being multiplied by the scale factor and that the scale factor divided by the scale factor is 1, hence the ratios will be the same.
Then I explained that they had created a trig table which could be used to find the side length or acute angle of a right triangle. I showed them a trig table for all whole numbers from 1° to 90° and told them that, back before there were computers, people had accurately created triangles with all of these angles and calculated the ratios.
Side note: Up until yesterday, I was going to have them use the trig table for all their trig work in cycle 1. But I changed my mind yesterday afternoon. I use trig tables in grade 10 applied very successfully. Many of those students have trouble with any solution that requires multiple steps, so giving them the trig table removes one layer of abstraction - they don't need to think about which trig ratio they are finding, just that it's opposite/hypotenuse, for example. However, my grade 10 academic students should all be able to work through that and I decided it might be doing them a disservice by waiting to introduce the names of the ratios.
Back to today's class. I then told them that all of these values had been programmed into their calculators <insert speech about needing a good scientific calculators>. Although it might have been fun to have student give the ratios names, we went with tradition instead.
We went over some basics to make sure everyone knew how to use their calculators and that none was in radian mode.
I really emphasized that they should use the brackets (parentheses to my American readers) on their calculators to help keep their answers as exact as possible. I showed them that for part (c), above, using 0.88 resulted in the answer being off by a full degree. Then we moved on to actually using trig.
They were doing really well up to this point, but got stuck on the next one.
I was so happy that no one said "cross multiply!". We looked back at what we had done to get rid of the fraction when there was a number in the denominator, and followed the same process. They got stuck again. Many wanted to subtract cos(40) from both sides. I wrote it on the whiteboard x * 0.6 = 30 (where 0.6 was my bad approximation of cos 40) and they still wanted to subtract. But when I rewrote that as 0.6x = 30 the light bulb went on and they said "We need to divide!". They don't seem to be looking for shortcuts and seem to be really buying in to understanding why we are doing what we are doing. I like that.
Here is today's homework set. We have a PD day tomorrow and Monday is Thanksgiving so my next blog post should be on Tuesday.
Wednesday, 7 October 2015
MPM2D - Day 21: Intro to Trig
I talked very little in today's class because my students were busy working. They started with the similar triangle word problems that I had handed out at the end of yesterday's class. I had them write the answers on the board and if there were two different answers for the same question, someone wrote their solution on the whiteboard. It all went very smoothly - they didn't have many questions.
Once most students had finished those questions, we moved on to trig. They have never encountered trig before so we are starting fresh. I like to introduce it with act I of this (Boat on the River) 3-act from Andrew Stadel.
They quickly got to the question:
We talked about why, as the captain of this ship, this would be an important issue to figure out before attempting to fit under the bridge. In order to calculate that angle...
I like to throw in a bit about how trig is actually used in "real life".
After we discussed how to name the sides of a right triangles (opposite, adjacent & hypotenuse), I had them work in groups to make their own trig tables. With the help of protractors, they had to draw triangles, then measure and record the sides lengths. They then had to calculate the ratios of sides. Here's my version of the table they were working on, found in this handout.
There were some good questions along the way as I circulated that could be paraphrased "Does it matter what size my triangle is?". That's as far as we got today. Here is homework set 18.
Once most students had finished those questions, we moved on to trig. They have never encountered trig before so we are starting fresh. I like to introduce it with act I of this (Boat on the River) 3-act from Andrew Stadel.
They quickly got to the question:
We talked about why, as the captain of this ship, this would be an important issue to figure out before attempting to fit under the bridge. In order to calculate that angle...
I like to throw in a bit about how trig is actually used in "real life".
After we discussed how to name the sides of a right triangles (opposite, adjacent & hypotenuse), I had them work in groups to make their own trig tables. With the help of protractors, they had to draw triangles, then measure and record the sides lengths. They then had to calculate the ratios of sides. Here's my version of the table they were working on, found in this handout.
There were some good questions along the way as I circulated that could be paraphrased "Does it matter what size my triangle is?". That's as far as we got today. Here is homework set 18.
Tuesday, 6 October 2015
MPM2D - Day 20: Similar Triangles & Classifying Triangles
Looking over homework set 16 last night only confirmed that my students generally had no idea what I was asking them to do. I started today with a triangle in GeoGebra and asked what kind of triangle it was.
They said they couldn't tell - that we needed to know the side lengths. I showed them the side lengths and moved the vertices around to create different types of triangles. I then asked how they could tell if they only had the coordinates of the vertices. A little brainstorming in their groups led them to say that they could find the distance between points. Bingo! There were still some confused looks so I picked some random points and they told me how to find the length of that segment (see shot of whiteboard, below).
Then I asked how we could tell it was a right triangle. Measure the angles, of course! When I asked if they could really tell the difference between an 89° angle and a 90° angle when measuring with a protractor, all but one student said no. More brainstorming followed and they came up with the strategy of finding the lengths of the three sides and seeing if the Pythagorean theorem holds true. I made my triangle in GeoGebra have a right angle and asked if that strategy worked. It looked something like this:
It was very close to working, but not exact because the side lengths had been rounded. If students had used the distance formula to find the side lengths and kept the lengths in exact form, then they could definitely show whether there was a right angle. But what if they didn't want to calculate all the side lengths? How could they show that two lines crossed at a right angle? I added lines in GeoGebra to help clarify what I was asking but that didn't seem to help. So I opened Desmos and entered two equations in standard form (which I then hid) and asked them to talk in their groups again.
As I circulated and asked what they had figured out, groups slowly began saying words like "perpendicular" and "slope" and "negative reciprocal". I showed them my equations which I rearranged into slope-intercept form and they could see that one had a slope of 2/3 while the other had a slope of -3/2. Okay - back to our triangles... we can find the slope of each line segment and compare them to see if there are any negative reciprocals to determine if it is a right triangle. This was the work on the whiteboard along the way:
We also talked about whether you could use more than one descriptor for a triangle. Can you have an equilateral right triangle? An isosceles right triangle? How many are possible? They seemed to indicate that they now understood what to do for homework set 16 so I told them that they would get a second try at it tonight (no new homework).
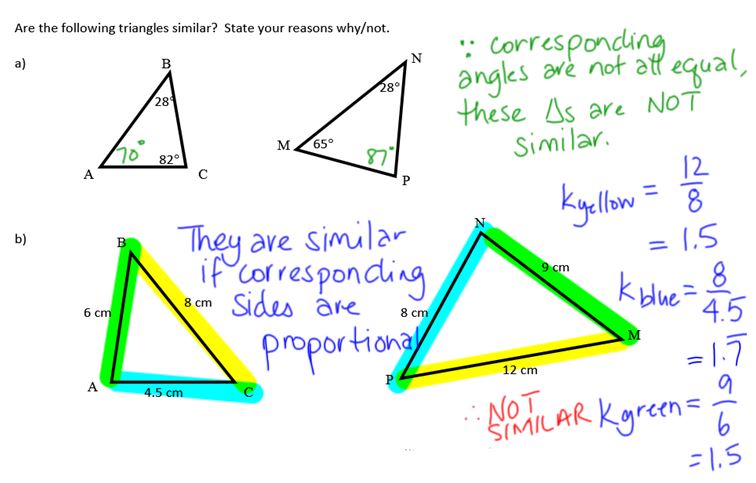
Our little (ha!) aside taken care of, we turned our attention back to similar triangles. I had students do a little recap of yesterday's work to help those who had missed yesterday's class. Then they worked through two questions that asked whether the triangles were similar:
And then two questions where they had to find missing information:
They had a little time to start working on this similar triangle handout, which we will continue tomorrow before jumping into trig.
They said they couldn't tell - that we needed to know the side lengths. I showed them the side lengths and moved the vertices around to create different types of triangles. I then asked how they could tell if they only had the coordinates of the vertices. A little brainstorming in their groups led them to say that they could find the distance between points. Bingo! There were still some confused looks so I picked some random points and they told me how to find the length of that segment (see shot of whiteboard, below).
Then I asked how we could tell it was a right triangle. Measure the angles, of course! When I asked if they could really tell the difference between an 89° angle and a 90° angle when measuring with a protractor, all but one student said no. More brainstorming followed and they came up with the strategy of finding the lengths of the three sides and seeing if the Pythagorean theorem holds true. I made my triangle in GeoGebra have a right angle and asked if that strategy worked. It looked something like this:
It was very close to working, but not exact because the side lengths had been rounded. If students had used the distance formula to find the side lengths and kept the lengths in exact form, then they could definitely show whether there was a right angle. But what if they didn't want to calculate all the side lengths? How could they show that two lines crossed at a right angle? I added lines in GeoGebra to help clarify what I was asking but that didn't seem to help. So I opened Desmos and entered two equations in standard form (which I then hid) and asked them to talk in their groups again.
As I circulated and asked what they had figured out, groups slowly began saying words like "perpendicular" and "slope" and "negative reciprocal". I showed them my equations which I rearranged into slope-intercept form and they could see that one had a slope of 2/3 while the other had a slope of -3/2. Okay - back to our triangles... we can find the slope of each line segment and compare them to see if there are any negative reciprocals to determine if it is a right triangle. This was the work on the whiteboard along the way:
We also talked about whether you could use more than one descriptor for a triangle. Can you have an equilateral right triangle? An isosceles right triangle? How many are possible? They seemed to indicate that they now understood what to do for homework set 16 so I told them that they would get a second try at it tonight (no new homework).
Our little (ha!) aside taken care of, we turned our attention back to similar triangles. I had students do a little recap of yesterday's work to help those who had missed yesterday's class. Then they worked through two questions that asked whether the triangles were similar:
And then two questions where they had to find missing information:
They had a little time to start working on this similar triangle handout, which we will continue tomorrow before jumping into trig.
Monday, 5 October 2015
MPM2D - Day 19: Similar Triangles
While my students started on this investigation about similar figures, I took a look through the homework they had handed in (homework set 16). Yikes! Clearly, the vast majority of my class did not make the link between finding the distance between two points and the lengths of the sides of triangles. I will go through their homework more carefully later, but I definitely need to make some time in class to have them find the connections.
I have to say that my preparation for today turned out to be less than stellar. I chose to use the investigation I have used with my MPM2D class before and a handout that I use with my grade 10 applied class. I should have thought through this a little more and consolidated the two into one as there was considerable overlap. So noted for next time. Meanwhile, my students were measuring angles and side lengths, and trying to draw some conclusions about what makes shapes similar.
It didn't take long for there to be consensus that all the corresponding angles were equal. However, I have these set up so that it could look like there is some additive property between the sides if you don't check all the lengths. It took a bit more work to sort out that each side of the smaller shape is in fact multiplied by a constant to get the length of the corresponding side in the similar shape. I stopped there with this investigation (some had already been working on the flip side). Before switching over to this handout, we went over how sides and angles are names in triangles, along with a few pertinent facts.
Then they once again measured side lengths and angles - I suggested they split up the work within their groups and this is what we found:
They seemed to understand that the 1.7 means that the larger triangle is 1.7 time larger than the smaller one. We gave the number a name and talked about how you can tell if triangles are similar. I am not emphasizing proving similarity during this cycle - I will do that in cycle 2 or 3.
Next I got out the highlighters so that we could work through an example together. I encourage my students to highlight corresponding sides when they start working with similar triangles. It then becomes obvious which sides are corresponding as they work through the question. I heard things like "We know both blue sides so we can use those to find the scale factor".
I loved it when a student suggested multiplying 12 by 1.5 to get the length of x. We tried and decided that 18 didn't make sense for the small triangle and therefore needed a different strategy.
We will continue with more similar triangle work tomorrow. Here is today's homework set.
I have to say that my preparation for today turned out to be less than stellar. I chose to use the investigation I have used with my MPM2D class before and a handout that I use with my grade 10 applied class. I should have thought through this a little more and consolidated the two into one as there was considerable overlap. So noted for next time. Meanwhile, my students were measuring angles and side lengths, and trying to draw some conclusions about what makes shapes similar.
It didn't take long for there to be consensus that all the corresponding angles were equal. However, I have these set up so that it could look like there is some additive property between the sides if you don't check all the lengths. It took a bit more work to sort out that each side of the smaller shape is in fact multiplied by a constant to get the length of the corresponding side in the similar shape. I stopped there with this investigation (some had already been working on the flip side). Before switching over to this handout, we went over how sides and angles are names in triangles, along with a few pertinent facts.
Then they once again measured side lengths and angles - I suggested they split up the work within their groups and this is what we found:
They seemed to understand that the 1.7 means that the larger triangle is 1.7 time larger than the smaller one. We gave the number a name and talked about how you can tell if triangles are similar. I am not emphasizing proving similarity during this cycle - I will do that in cycle 2 or 3.
I loved it when a student suggested multiplying 12 by 1.5 to get the length of x. We tried and decided that 18 didn't make sense for the small triangle and therefore needed a different strategy.
We will continue with more similar triangle work tomorrow. Here is today's homework set.
Friday, 2 October 2015
MPM2D - Day 18: Quiz #2
There was a little bit of anxiety in the room at the beginning of class today as it is quiz day. I hate that my students get stressed about a quiz, but I understand it. After returning homework set 14, which I had corrected last night, I gave them 15 minutes to talk to each other about any lingering issues around solving by substitution or elimination. I also answered questions one-on-one. Before starting the quiz I warned them that the last question was unlike any they had done, but that they should try their best. I also told them not to feel bad if they couldn't get it. I really want to see who can take what we've done and apply it to something new. Progress reports are due next week and that question will help me provide more informed comments about all my students.
I told them that they could have the rest of class for the quiz - I'm trying to take away the anxiety surrounding timed tests as much as possible. Upon completion of the quiz they will work on today's homework set found here. It is all about classifying triangles so plenty of practice finding the distance between two points and slopes of line segments.
If they all finish early, we will watch this TED-Ed talk about how Pixar uses math - it specifically mentions midpoints, which is what we did yesterday.
I told them that they could have the rest of class for the quiz - I'm trying to take away the anxiety surrounding timed tests as much as possible. Upon completion of the quiz they will work on today's homework set found here. It is all about classifying triangles so plenty of practice finding the distance between two points and slopes of line segments.
If they all finish early, we will watch this TED-Ed talk about how Pixar uses math - it specifically mentions midpoints, which is what we did yesterday.
It was nice to hear a few students say that they prefer spiralling to learning with units. They also said that the amount of homework I am giving is reasonable. All good things to end the week.
Thursday, 1 October 2015
MPM2D - Day 17: Midpoint
We started today by finishing yesterday's lesson on the distance between two points.
At this point I realized that we should probably do an example using the formula. I crowd sourced values for the coordinates and this is what we got:
The issue of x1 - x2 versus x2 - x1 came up naturally and one pair of students said that it didn't make a difference as they had tried it both ways (yay!). So I asked why. It took a little digging but we got there eventually...
A student also said that their calculator gave a different answer which led me to talk about simplifying roots a little (this is in the grade 11 curriculum in Ontario).
Then we moved on to finding the midpoint.
It is amazing how "trained" our students are - we just worked out the distance formula, so I must need to use that! About half of the class worked out the distance between the two points and divided that by 2. I asked what they had found and whether that was the midpoint which caused them to stop and scrunch up their faces a little. I let them work on it a little longer before I put this up:
Some immediately made the connection to finding the axis of symmetry given the zeros of a parabola.
We consolidated:
They worked through a simple example and a student wrote their solution on the board which we, as a class, improved. The mathematics was all correct, but it looked like magic numbers on a page. I stress the fact that solutions should be written such that anyone in their class can follow from the beginning all the way to the end.
Then they tried this one:
There were many different approaches used to solve this (two shown above) along with many students having no idea where to even begin. My response to them was "You have a midpoint formula - which parts of it do you know?" or something like that. We will definitely have to do a few more practice questions like this.
It was interesting to note that a number of students found the difference between the values and added/subtracted that to the midpoint to find the endpoint. I think I will try to incorporate that into a homework set somehow.
They got the last 10 minutes to work on this solving linear systems review in preparation for tomorrow's quiz. They also got this for homework.
At this point I realized that we should probably do an example using the formula. I crowd sourced values for the coordinates and this is what we got:
The issue of x1 - x2 versus x2 - x1 came up naturally and one pair of students said that it didn't make a difference as they had tried it both ways (yay!). So I asked why. It took a little digging but we got there eventually...
A student also said that their calculator gave a different answer which led me to talk about simplifying roots a little (this is in the grade 11 curriculum in Ontario).
Then we moved on to finding the midpoint.
It is amazing how "trained" our students are - we just worked out the distance formula, so I must need to use that! About half of the class worked out the distance between the two points and divided that by 2. I asked what they had found and whether that was the midpoint which caused them to stop and scrunch up their faces a little. I let them work on it a little longer before I put this up:
Some immediately made the connection to finding the axis of symmetry given the zeros of a parabola.
We consolidated:
They worked through a simple example and a student wrote their solution on the board which we, as a class, improved. The mathematics was all correct, but it looked like magic numbers on a page. I stress the fact that solutions should be written such that anyone in their class can follow from the beginning all the way to the end.
Then they tried this one:
There were many different approaches used to solve this (two shown above) along with many students having no idea where to even begin. My response to them was "You have a midpoint formula - which parts of it do you know?" or something like that. We will definitely have to do a few more practice questions like this.
It was interesting to note that a number of students found the difference between the values and added/subtracted that to the midpoint to find the endpoint. I think I will try to incorporate that into a homework set somehow.
They got the last 10 minutes to work on this solving linear systems review in preparation for tomorrow's quiz. They also got this for homework.
Subscribe to:
Posts (Atom)